About Me

Someone who fell in love with the natural world early on and has been smitten ever since. A blade of grass, a mighty mountain, a tiny raindrop, a roaring waterfall, all fill me with awe and wonder. Nature feels home, filled with warmth and love. It pains my heart to see this home being ravaged. This blog is an effort to find tweaks in modern living to preserve the sanctity of this home. I sincerely hope that you join me in this green karmic journey.

Wednesday, 26 January 2022

Why Compost?

Compost - Black Gold
Compost aka Black Gold

Good question! 

With a fantastic answer:)

Because it's a Win-Win-Win. For you, your plants and your planet. 

Composting is like witnessing the circle of life unfold right in front of your eyes. It shows you how everything is interconnected and how one system feeds beautifully into another. 

You eat veggies and fruits and discard the peels. Those peels get mixed with soil and dried leaves. Microbes feast on this mix and decompose it. The decomposed mix is an elixir for plants. Plants produce healthy veggies and fruits that you eat and discard the peels...you get the drift. 

Those of you who are convinced, stop reading here and start setting up the composting process. Those who need more convincing, read on!

Why compost?

1. To save organic matter from going into landfills: 

Organic matter is what makes the soil rich and healthy. Throwing away organic matter is a double whammy - robbing the soil of nutrients and clogging landfills with stuff that emits a greenhouse gas. Basically, throwing something incredibly useful to make it totally harmful. How smart is that!(And it takes the smartest species on earth to accomplish this.)

Organic matter doesn't biodegrade in a landfill. On the contrary, it emits methane. Methane is a greenhouse gas which is at least 20 times more potent than carbon dioxide. 

When you compost, you reduce greenhouse gases going into the atmosphere. Imagine that - you could be a global-warming-fighter operating right from your home. Feel the green cape fluttering around you yet?

2. For your kids: 

Kids know the pressing issues of climate change. They're the ones who will suffer the consequences the most. 

When kids see you act, they'll take pride in the fact that their family is a part of the solution. When helping you with composting, they'll learn the process and when they run their own households, a composter would be a natural part of their homes. Action speaks more than words. 

Don't we all want a good future for our kids? One of the coolest gifts for them would be a cool Earth!

3. To improve soil health: 

There are alarming reports about how earth's topsoil is depleting. 
With our current ways, we could run out of topsoil in another 60 years. 

No topsoil = No crops 
No crops = No food

When you compost and return the goodness to earth, you help improve soil quality. Healthy soil also holds much more water and helps reduce erosion and flooding. If you grow vegetables and flowers, this nutritious compost is like manna from heaven. Even if you don't grow anything, having good soil quality is good for your yard.

4. To conserve fuel:

By reducing organic and yard waste going out of your household, you're not only easing the burden on overflowing landfills, but you're also helping conserve fuel that is required to ferry this waste till landfills. 

Less kitchen waste to be carried around = Less fuel consumed. 

5. To reduce your trash bag content and hence trash bag usage:

Look into your filled trash bag. How much organic waste is in there? 

If you cook most of your meals with fresh produce, the proportion of organic waste in your trash bag would be quite high. You can divert all this organic waste to your compost bin. Less trash means fewer trash bags too. 

In addition, gardening waste bags will also get reduced because you can divert leaves and garden clippings to the compost bin as well. 

More bags saved, yay!! (In fact, this is what motivated me to start composting. I used to recycle stuff wherever I could. It was the kitchen waste that could not be stored for long and needed a plastic bag for disposal. I cringed every time I had to use a plastic bag for kitchen waste. So one fine day, I said enough is enough and started composting.)

6. To get rid of stinky kitchen trash bins: 

In single family homes in the US, waste is not collected daily. It's collected weekly at my place. You're supposed to store the kitchen waste for a week, which starts to rot. Soon, the trash bin starts smelling and it takes a lot of courage to even open the lid to toss in the waste.

A much cleaner alternative is to dispose kitchen scraps in a composter. By adding browns and with proper aeration, the waste decomposes without unpleasant smells.

7. To express your love to your houseplants: 

"Jo gardening se kare pyaar, wo composting se kaise kare inkaar!" 
(My non- Hindi speaking readers, please excuse my take on a famous jingle from the 80s:))

If you like plants and gardening, you'll love composting. Remember the joy when you spot a seedling sprout, a flower bloom or a baby tomato peek through leaves? Composting gives you the same woozy feeling of happiness when you see your kitchen scraps convert into life giving black gold!


8. To witness a beautiful natural process: 

Nature does not know waste. Every output is an input. It just converts one useful resource into another. 

Nature also shows an intricate interconnection between everything. Take a piece away, and you jeopardize the whole system. Composting gives you a subtle reminder of this interdependence.

Are you convinced yet?

I can keep adding to the list in different ways. But the gist remains that if you take from the earth with one hand, you should return to it with the other. Composting completes this give and take and completes the circle of life. 

Doubts? Keep them coming! But the best way to slay your doubts is to start the process and learn along the way. For the rest, there's Google, FB composting groups, composting practitioners in your locality and this blog! :) You can post your questions in the comments section and I'll try my best to answer them.

Friday, 22 October 2021

How to Cook a Mean Compost

What is Compost?

If you ask plants, compost is a root-licking delicacy:) If you ask any composting enthusiast, compost is black gold. Simply stated, it is decayed organic matter, which is great for soil structure and provides beneficial nutrients to plants.

From the soil, to the soil - closing the loop

Cooking Time: Approx. 3-4 months

Serves: Everyone's interest!

Equipment: According to taste.

There are various methods and equipment used for composting. 
Pile, bin, tumbler, sub pod etc. In this post, I'll talk about tumblers and simple bins.  

For Collecting Kitchen Scraps

Allocate a covered bin to collect compostable kitchen scraps. This bin is not a composter, it's just a collection point. Though you can use any covered bin, I found this kitchen countertop bin to be very useful. It also comes as a set. 

It has a charcoal filter in the lid that keeps smells at bay. It blends smartly with a modern kitchen and sits pretty on the countertop. You can collect your scraps till you're ready to make that trip to the compost tumbler. I have been using this for a few years now. I has worked well for me. (Mine developed little holes in it as it isn't very thick. I'm on my third bin now!)

For Cooking the Compost

A Compost Tumbler: 
A compost tumbler is a kind of a bin with an axle running through the chamber. It's called a tumbler as it can be rotated on the axle. The tumbler can have one or two chambers.

The advantage of a tumbler is that it can be rotated on its axis to tumble and aerate the mix. A tumbler takes away the messiness from the composting process. It is visually pleasing and makes things more organized. There are many tumblers out there. Take your pick. 

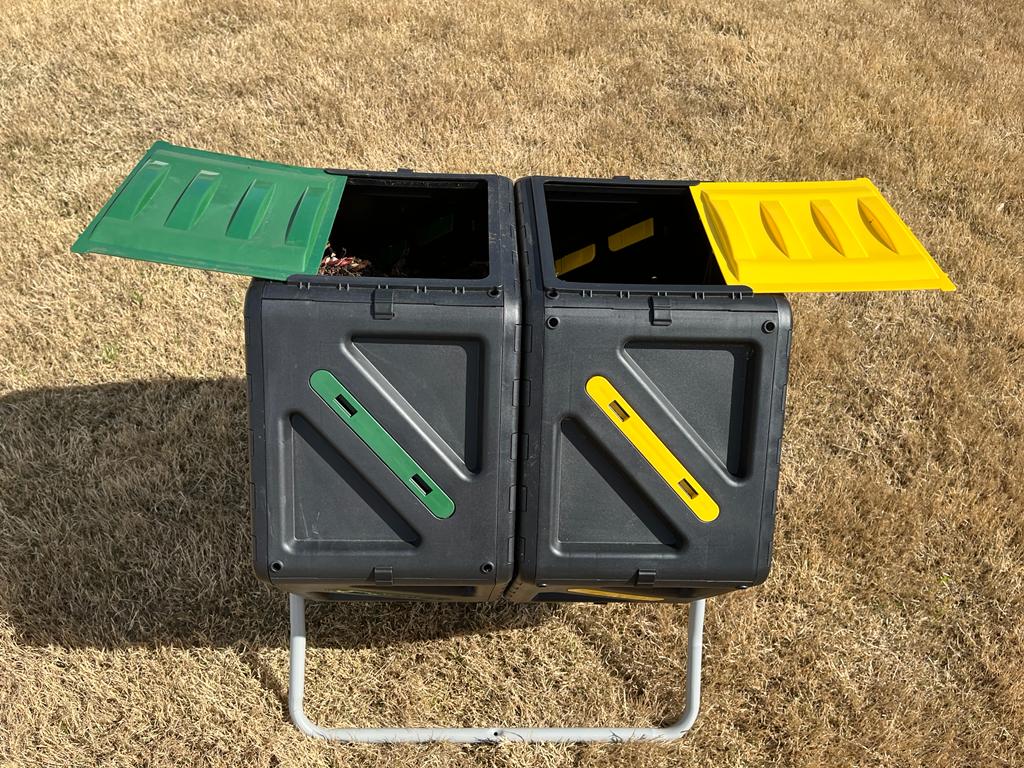
1.  Miracle-Gro Tumbler - I use this dual-chambered tumbler and am very pleased with it. It has two color flaps which make it easy to identify the chamber to which you're adding raw material and the chamber which is full and resting. 


Dual-chambered Miracle Gro Compost Tumbler 


Edit: After 3 years of load bearing, the metal stand of my Miracle Gro tumbler broke. I still use the tumbler and roll it on the ground for mixing. A friend has a tumbler from another brand - FCMP - which has been going strong for 8 years now. More on it below. 

2.  FCMP Compost Tumbler - This is a dual-chambered tumbler and a very popular choice too. It is black in color and the two flaps have been differentiated by two signs - a 'plus' for the active chamber and a 'clock face' for the maturing chamber. 

There are single chambered bins too. I would recommend a dual chambered bin, where one chamber can be active and the other can be used for maturing the compost. If you use a single chambered tumbler, you'll have to find another bin to rest your compost before you can start refilling the single chamber.


Any container, bucket or a clay pot with a lid: 

If you don't want to invest in any equipment just as yet, that's fine. You only need a container to get started. Ideally, you'll need three. Start with one and use others when the first one fills up. 
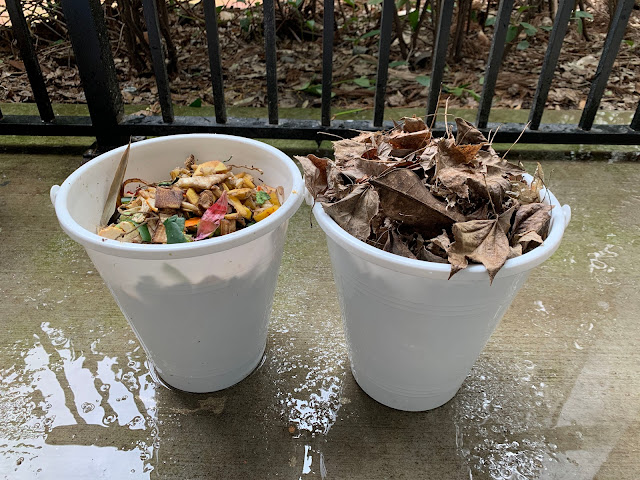

I used my daughter's beach buckets to start composting.
Greens and browns collected and ready to be mixed. The contents of both buckets will be put in one. 


I would encourage you to start off with any old and handy container. If your'e buying fresh bins, go for a capacity of 5 gallons each. You'll need a drill machine to make holes in the bin of your choice. This is important for aeration. 

As you get a hang of the composting process, you'll know what method and equipment is best for your family's needs. 

For me, it was ok to start with these containers. I wanted to test composting and didn't know if it would work. After a while, the containers got messy (I didn't drill holes in them and the mix got wet) and it was difficult to turn the compost. I also needed multiple containers. The whole area looked disorganized. 

As time passed, I was sold on composting and was never looking back. I also moved in a house and had enough space for a tumbler in my yard. I'm a happy bunny with the tumbler now!
Ingredients:

Greens (Rich in Nitrogen):
Get all the greens you've got!

Browns (Rich in Carbon):
Get thrice the quantity of greens! 

GREENS (Nitrogen)

BROWNS (Carbon)

NO-NOS

Vegetable Peels

Dried Leaves - Maple, Elm, Ash, Poplar, Willow, Fruit tree leaves

Cooked Food

Fruit Peels 

Dried Plants, Twigs

Dairy Products

Citrus Peels 

Straw

Meat, Bones

Watermelon Rind

Brown Cardboard

Pet Waste

Egg Shells

Bagasse Packaging

Diseased Plants

Coffee Grounds

Bagasse Plates

Weeds

Tea Bags

Uncoated Paper 

Glossy Paper

Rinsed Tea Leaves 

100% Paper Plates

Black Walnut Tree Leaves

Peanut, Pistachio Shells

Cardboard Egg CartonsGrass, Plant Cuttings if Treated with Pesticides

Mango, Avocado Pits

Cardboard Tubes from Tissue Rolls, Toilet Rolls etc.Pine Needles - Acidic in nature. Add sparingly.

Corn Husk & Cob

Sawdust, Wood Chips from Untreated or Natural WoodOak leaves - high in lignin, take years to decompose. Add sparingly.

Cotton, Pure Cotton Rags, Natural Wool


Grass, Plant Cuttings


Flowers


I prefer only dry leaves and plants as my browns as they are 100% natural

I think it's a better choice to recycle cardboard than to compost it. Same goes for newspaper and any other kind of paper.

However, shredded cardboard can save the day if you don't have access to dry leaves. I used cardboard during COVID lockdown, when I couldn't go to any trails to collect dry leaves.

Cooked food, dairy and meat can attract rodents. Raw meat can also introduce harmful bacteria like Salmonella, E Coli etc. in the compost pile and therefore should not be added to the compost. (You should not be wasting food in the first place! Please read my blog post to stop food waste.)

I am a vegetarian and my compost ingredients consist mostly of veggie and fruit peels and rinsed tea leaves. I add dry leaves and soil to this mix. I don't like to add any cardboard, paper or processed stuff to my mix.

Accelerator : 

An accelerator is supposed to fasten the pace of decomposition. In other words, it helps increase microbial activity in the mix. 

Do note, that microbes are present everywhere and the mix will eventually get decomposed, accelerator or not. Some people like to buy an accelerator. I have never bought it. 

Things that can be used as an accelerator:

Garden Soil or Store Bought Soil (I add this)
or
Ready Compost (I add this)
or
Thin Curd or Whey (I add this sometimes)
or
Sour idli-dosa batter (I generally don't do this)
or
Cocopeat (I never bought this) 
or 
A packaged accelerator (I never bought this) 

Method:

Whether you're using a bin or a compost tumbler, the basic process remains the same. I started with a bin to get the hang of the process and now I've switched to a compost tumbler for ease of use.

1. If using a bin, drill holes on the sides and on the lid of the chosen bin. The holes are for air circulation. Holes can be drilled at the bottom too. Some water (which is also called compost tea) might get released during the composting process. Place a tray or a tub below the bin to collect this water. 

I didn't have a drill machine, so I didn't drill any holes. I just used to poke the mix quite often to aerate it.

2. Put a couple of inches of soil in the bucket. 

3. Cut greens in small pieces. This helps in faster decomposition. Remember, the smaller and softer the stuff, the faster it's going to decompose. Put greens in the bin. 

4. Add double or triple the quantity of dried leaves which will act as browns. You can crush leaves lightly for a faster decomposition. 

5. Add accelerator. I generally use garden soil or ready compost or a bit of sour curd as an accelerator. 

6. Mix with a shovel. Cover it with browns again. 

7. Keep adding greens and browns to this mix everyday or every few days and keep turning. I add a bit of soil or leaves as the top layer every time I add greens to the bin. This deters flies.  

8. When the bin gets full, let it rest. I poke the mix every few days for it to aerate. If you're using a tumbler, turn it every other day too. The compost will get ready in around 2 months, depending on a lot of factors, including weather. 

9. While the first bin rests, start the same process in another bin. If you're using a double chambered compost tumbler, let the first chamber rest and start the process in another chamber.

Location of the bin:


Keep it on a flat surface and accessible, yet not too close to your house. 

Place a tray or a tub below the container if you want to protect your flooring from compost tea spillage. Compost tea is the liquid that oozes out of the composting mix.

I leave my tumbler out in the sun and rain, with the flaps closed - of course! If the sun is too strong in your area, you can keep the tumbler in a slightly shaded spot. 

What should the consistency of the mix be?

The consistency of the mix should be like a moist sponge. When you pick a handful of this mix and wring it, water shouldn't drip out of your hand. However, the mix should not be totally dry. It should be feel moist. 

Too wet, and the compost will start smelling. 
Too dry, and the compost will show a white fungal growth and won't decompose well.  

Common Issues:

1. Smelly Compost - If you've added too little browns, it would start smelling bad. To rectify this, add at least double or triple the browns, get the moisture level right and aerate the compost well.

You can empty the contents of the bin in another bin or a tray and sun and aerate it for a while. Don't leave it out for too long as it would attract flies.

2. Wet Compost - Again, add more browns and aerate it well. The issue of smelly and wet compost go hand in hand. The compost starts smelling when it's wet and not well aerated.

3. Flies and Fruit Flies - Make sure that the compost is covered with browns or with soil. If there are fruit scraps like banana peels, pineapple skin, melon rinds, lemon peels etc. fruit flies get attracted to them. The easiest way is to bury these peels in the compost and cover them with soil. This helps prevents flies to get to their food source. 

4. Maggots in the Compost - Add more browns and get the moisture level right.

5. Dry Compost - If the mix has gotten too dry, it won't decompose well. You can add some water to the mix. 

6. Fungus in the Compost - You might see some white stuff in the decomposing mix. This is fungus, which is a decomposer. It's not harmful for your compost but a sign that your mix is decomposing, which it's supposed to be doing! 

So basically, the answer to most composting issues would be:

Add More Browns!!
Add More Air!!
Keep it Moist!!

Cooking Time:

This depends on a lot of factors. I would say, don't worry too much about it. Fill it, shut it, forget it (errr...just keep aerating it though!). 

Decomposition is a slow process. It takes time and even if you are at it diligently, expect just 1 or 2 rounds of totally finished compost in a year. 

If the temperature is in the 70s (F) and you've cut the greens in small bits and have diligently balanced greens and browns, the compost can get there anywhere between 4-5 months. If you live in a cold region, the scraps don't get decomposed in cold weather. (I still keep adding to my composter in winters and things start looking up spring onwards.)

When the compost is done, you'll still find some stuff that hasn't been decomposed - like pistachio and peanut shells, mango and avocado pits, corn cobs etc. You can take this undecomposed stuff and add it to the next batch of compost.  

You might be surprised to see that the final output has reduced to one-third of the original mass or even less. As organic stuff decomposes, it loses moisture and hence volume. 

When the mix looks brown and smells like earth, when you're not able to differentiate between a former banana skin or an avocado peel, when you pick a lump and it crumbles well in your hand, voila! You've arrived! Your compost is ready and it's time to celebrate!

Serve:

When the compost is done, serve with lots of love to your plants. Add a handful to top up your pots or add a layer to your beds. Your plants will express their gratitude by being healthier, greener and more productive:) 


Wednesday, 13 May 2020

Don't Waste The Seed - Eat Or Treat!

Since last few days, I have a little, restless investigator visiting my compost bucket. She relentlessly pokes and turns the compost, spreading bits and pieces all around, messing up my balcony!

I wondered what she was looking for in the compost. Was it something to build her nest with? Was it food? I think, it was a bit of both!

Then I had an idea. If she was looking for food, I could offer her something better. I had saved a few cantaloupe seeds from the last time I relished the melon. I thought of offering these seeds to the little birdie. 

Musk melon seeds are loaded with vitamins (A,C, E and K) and minerals like zinc and magnesium. 

It was such a delight when she pecked at them. There was another bird following her. Anya told me that was the baby. Soon, the Mom was feeding her baby with the seed too!

That was my aha moment. I had been discarding all watermelon, cantaloupe and pumpkin seeds. I did wash and dry them occasionally, but not always. Every time I threw them away, I remembered my childhood. 


The goodness that you throw away, if you don't use the seeds!

Summers meant vacations and melons. We would wash and dry the seeds of musk melons and watermelons and spend lazy hours chatting, peeling and relishing those seeds. 


Watermelon seeds are rich in magnesium, iron, folate and fiber.

The white and delicate seeds of musk melons were easier to crack than the black and hard seeds of watermelons. Both could be cracked by pressing between teeth in a certain manner.

I remember liking musk melon seeds better than watermelon ones. 
It was hard and slow work to peel those seeds but quite rewarding. 

Later, I got to know that these seeds are packed with nutrition.You can buy these kernels off the shelf. They are quite a delicacy and quite expensive too. 


Don't throw in landfill what you can share with your winged friends. 

We all know the nutritional benefits of pumpkin seeds. They are packed with micro nutrients like potassium, magnesium, iron, zinc and copper. We literally throw away nutrition when we don't use these seeds. 

Even if we don't use them for ourselves, we can offer them to our winged friends. 

Birds would relish both the seeds and the stringy pulp.

If you've a yard or a balcony, you can make a corner for birds. They love eating different fruits and berries. You can also offer them the whole gut of cantaloupe, pumpkin, squash etc. There's no need to separate the seeds out. They'll eat the pulpy strings and thank you for the treat. 

Birds  also love to peck at the leftover flesh of cantaloupe rinds. After they've cleaned the rinds, you can always toss the remains in your compost.

I've now decided never to throw away seeds or pulp of a melon, a pumpkin or a squash in the compost. If I want to use them for myself, I can dry the seeds. If I'm feeling lazy, I can leave the whole pulp and seeds for the birds. 

Thank you little birdie and my compost, for the lesson of the day!

This lesson also subtly highlights the issue that we have with modern lifestyle. 


We chuck away stuff (seeds) that come naturally packed (in a melon) to landfills (which emit methane) and then buy the same stuff (seeds) off the shelf (packaged in plastic) and again throw away the packaging in landfills (which cause leachates).

Just because we don't have time or energy to do the former. 
Just because we have a choice and can afford the latter! 

Just sayin'!

Leaving you with that thought! Ciao!

Image Credits: www.pexels.com

Monday, 11 May 2020

Guess What!


Guess What!!
I had made this shampoo with amla, reetha and shikakai (gooseberries, soap nuts and Acacia concinna).


On a whim, I took a picture and asked a 'green' friend to guess what it could be. I generally share all green news and views with this friend and wondered if he would be able to guess it. 

He couldn't. And just for the fun of it, I thought of asking all my friends. Here are the answers: 

Most Popular Guesses:

Jaljeera 
Keri Panna
Kaadha
Kanji

Also Rans: 

Jeera- Ajwain Water, Apple Juice, Apple Cider, Banana Stem Juice, Amla Juice, Pumpkin Juice, Lauki Juice, Sugarcane Juice,  Tamarind Water, Avocado Juice, Kale Juice, Toddy, Barley Water, Oreo Shake, Chamomile Tea, Lemon Water,Boiled Chickpeas/ Kidney Beans Water

Frustrated Tries: 

Mud Water
Gutter Water
Moraji Desai Inspired Drink ;)

Favorite Answer:

Compost Tea

I was surprised that nobody could guess it right. I thought that a few would have definitely used it, at least in their childhood. 

I guessed that the froth at the top might be a give away. But yeah, even sugarcane juice has froth:) Also, if you've not used soap nuts ever, you wouldn't know.

Now, if you recollect having used this shampoo, do let me know your recipe and experience. 

Ciao!! And thanks a ton for your answers:)

Saturday, 2 May 2020

How To Make a Natural Shampoo


Right: Soap Nut and Shikakai powder. Left: The mix with water

Nature is one stop shop for all our needs. It's a grocery store, a cosmetics shop and a medicine cabinet - all rolled into one. 

Seek and thou shalt find!

Growing up, I always washed my hair with a concoction of amla, reetha and shikakai (gooseberries, soap nuts and  acacia concina). Mom kept a powdered mix of this lovely trinity in a jar. 

I would soak a handful in an iron vessel overnight. The next day, it would be my natural, herbal shampoo with free hair color thrown in! Gooseberries soaked in an iron vessel gave a solid black color to the mix.

As life got busier, I started reaching for the bottled shampoo more often because I would forget to soak the mix overnight. 

Slowly, the switch to bottled shampoo was complete and the herbal mix retreated to the depths of the toiletries cabinet. 

In time, as I got more aware of the harmful chemicals in the shampoo, saw people with greying hair at a young age and the waste that a plastic shampoo bottle created, I decided to switch back to the trusted, old formula. 

About the ingredients:

Coarsely grounded Shikakai, Amla, Reetha - my holy trinity for hair care


Acacia concinna or Shikakai: Shikakai grows as pods on a medium sized tree. It is rich in antioxidants and is a great natural cleanser. Shikakai softens and thickens hair, reduces hair loss and slows graying.  It also brings shine to them.

Gooseberry or Amla: Rich in vitamins and antioxidants, amla is a superfood. Amla works wonders for both hair and skin. It has been a popular ingredient for hair care in India - be it in the form of shampoo or hair oil. 

Soapnuts or Reetha: Reetha contains a chemical called saponin which is a surfactant. A surfactant is something that helps remove dirt and grime from any surface. 

No surprise, sopanuts can be used as detergents, dish washing liquid, mopping liquid, body wash, hair wash etc. 

In addition, soapnuts have anti-fungal and anti-bacterial properties too. What's not to like about them!

How to buy these lovely ingredients for your hair?

If you want to buy dried pods and nuts, they are available online. Try to buy the one with minimal packaging. In India, you can buy them at a grocery store from a bin and can do without the packaging too! 

In case you are short of time and don't want to go the whole nine yards, you can buy a ready powdered mix. Like the one below. 

The powder can be soaked overnight or steeped in warm water just before use.

The froth in the solution is due to saponin of soap nuts.

Or you can make the shampoo on your own!!

I take 1:2:2  ratio of that coarsely grounded reetha, shikakai and amla. Soak the mix overnight in an iron wok. Next morning, mash the mix thoroughly and bring it to a boil. When cool, strain. 

Your 100% natural, full-of-goodness shampoo aka hair tea is ready!!!

I can't make it from scratch each time!

You can make a large batch and store it in a glass bottle in the refrigerator. It can easily last for a month. 

If you want to store it for a longer period, freeze the mix in ice trays. Take out required number of cubes and voila! You are good to go in a jiffy!

How to use?

Apply the tea to the scalp and gently massage it in. Leave it for 15-20 minutes before rinsing with cool, plain water. 

Avoid getting the mix in your eyes. It will sting! 

If you do manage to get it into your eyes, just wash the eyes with plain water. 

Customize the recipe:)

Every Mom and Grandmom has her own version of this concoction. 

My Mom occasionally added dried orange or lemon peels powder. I've heard people adding curd, fenugreek seeds etc. according to their type of hair.

Go ahead and ask your Mom, Grandmom or Aunt about your family's traditional recipe. 

This is the perfect time to do it:) Share your versions in the comments below. 

What to do with the leftover fibre?

Well, add it to your compost pile, of course, you Green whiz! 


From Earth. To Earth. Completing the Circle. 

Close your eyes, and be ready to get soaked in that awesome green wave of satisfaction that's going to knock you off your pretty feet!:)