What is Compost?
If you ask plants, compost is a root-licking delicacy:) If you ask any composting enthusiast, compost is black gold. Simply stated, it is decayed organic matter, which is great for soil structure and provides beneficial nutrients to plants.
 |
| From the soil, to the soil - closing the loop |
Cooking Time: Approx. 2 months
Serves: Everyone's interest!
Equipment: According to taste!
There are various methods and equipment used for composting. Pile, bin, tumbler, sub pod etc. In this post, I'll talk about tumblers and simple bins.
For Collecting Kitchen Scraps
Allocate a covered bin to collect compostable kitchen scraps. This bin is not a composter, it's just a collection point. Though you can use any covered bin, I found this kitchen countertop bin to be very useful. It also comes as a set.
It has a charcoal filter in the lid that keeps smells at bay. It blends smartly with a modern kitchen and sits pretty on the countertop. You can collect your scraps till you're ready to make that trip to the compost tumbler.
For Cooking the Compost
A Compost Tumbler:
A compost tumbler is a kind of a bin with an axle running through the chamber. It's called a tumbler as it can be rotated on the axle. The tumbler can have one or two chambers.
The advantage of a tumbler is that it can be rotated on its axis to tumble and aerate the mix. A tumbler takes away the messiness from the composting process. It is visually pleasing and makes things more organized. There are many tumblers out there. Take your pick.
1. Miracle-Gro Tumbler - I use this dual-chambered tumbler and am very pleased with it. It has two color flaps which make it easy to identify the chamber to which you're adding raw material and the chamber which is full and resting.

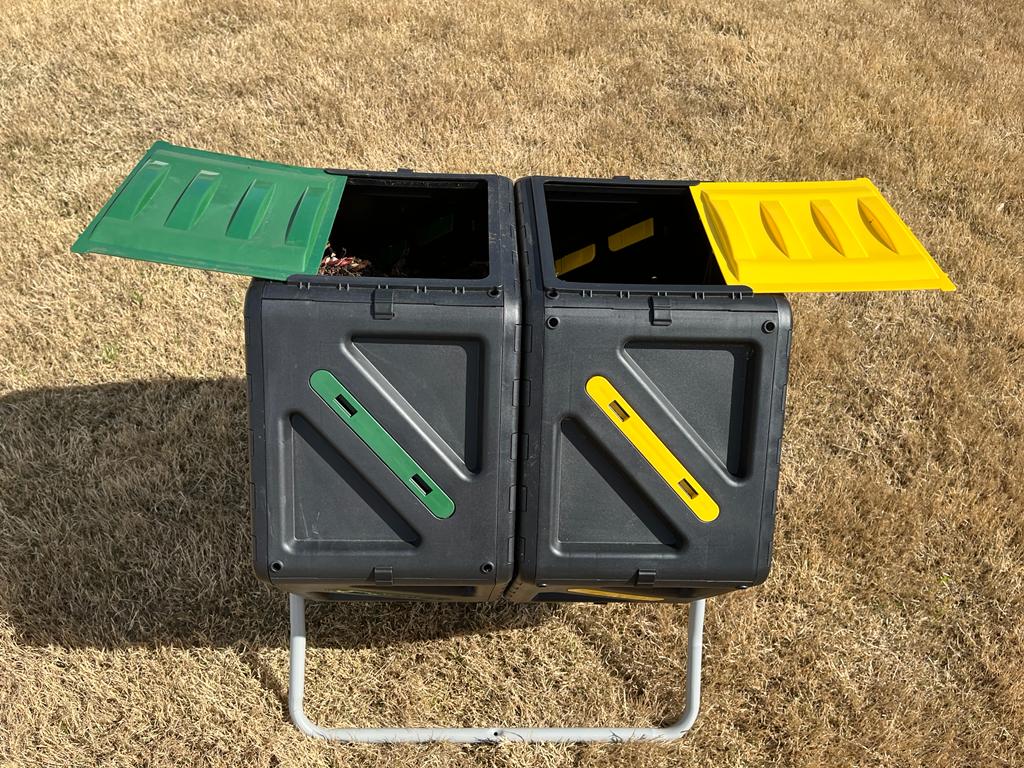 |
| Dual-chambered Miracle Gro Compost Tumbler |
2. FCMP compost tumbler - This is a dual-chambered tumbler and a very popular choice too. It is black in color and the two flaps have been differentiated by two signs - a 'plus' for the active chamber and a 'clock face' for the maturing chamber.
There are single chambered bins too. I would recommend a dual chambered bin, where one chamber can be active and the other can be used for maturing the compost. If you use a single chambered tumbler, you'll have to find another bin to rest your compost before you can start filling the
OR
Any bin, bucket or a clay pot with a lid:
If you don't want to invest in any equipment just as yet, that's fine. You only need a container to get started. Ideally, you'll need three. Start with one and use others when the first one fills up.
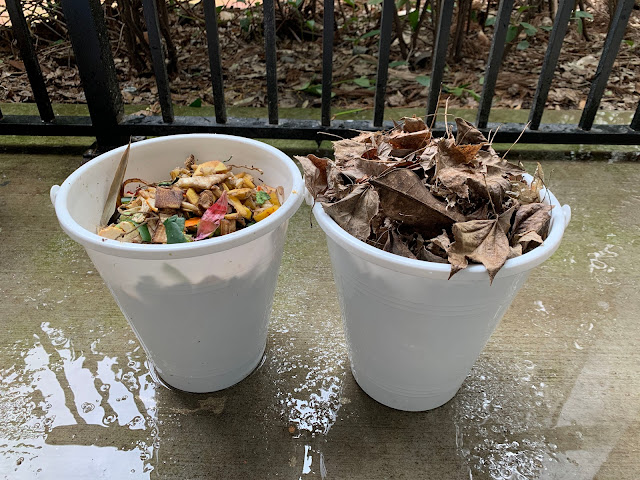 |
| I used my daughter's beach buckets to start composting. Greens and browns collected and ready to be mixed. The contents of both buckets will be put in one. |
I would encourage you to start off with any old and handy container. If your'e buying fresh bins, go for a capacity of 5 gallons each. You'll need a drill machine to make holes in the bin of your choice. This is important for aeration.
As you get a hang of the composting process, you'll know what method and equipment is best for your family's needs.
For me, it was ok to start with these containers. I wanted to test composting and didn't know if it would work. After a while, the containers got messy (I didn't drill holes in them and the mix got wet) and it was difficult to turn the compost. I also needed multiple containers. The whole area looked disorganized.
As time passed, I was sold on composting and was never looking back. I also moved in a house and had enough space for a tumbler in my yard. I'm a happy bunny with the tumbler now!
Greens (Rich in Nitrogen):
Get all the greens you've got!
Browns (Rich in Carbon):
Get thrice the quantity of greens!
Get thrice the quantity of greens!
 |
| I prefer only dry leaves and plants as my browns as they are 100% natural |
I think it's a better choice to recycle cardboard than to compost it. Same goes for newspaper and any other kind of paper.
However, shredded cardboard can save the day if you don't have access to dry leaves. I used cardboard during COVID lockdown, when I couldn't go to any trails to collect dry leaves.
Cooked food, dairy and meat can attract rodents. Raw meat can also introduce harmful bacteria like Salmonella, E Coli etc. in the compost pile and therefore should not be added to the compost. (You should not be wasting food in the first place! Please read my blog post to stop food waste.)
I am a vegetarian and my compost ingredients consist mostly of veggie and fruit peels and rinsed tea leaves. I add dry leaves and soil to this mix. I don't like to add any cardboard, paper or processed stuff to my mix.
Accelerator :
An accelerator is supposed to fasten the pace of decomposition. In other words, it helps increase microbial activity in the mix.
Do note, that microbes are present everywhere and the mix will eventually get decomposed, accelerator or not. Some people like to buy an accelerator. I have never bought it.
Things that can be used as an accelerator:
Garden Soil or Store Bought Soil (I add this)
or
Ready Compost (I add this)
or
or
Ready Compost (I add this)
or
Thin Curd or Whey (I add this sometimes)
or
Sour idli-dosa batter (I generally don't do this)
or
Cocopeat (I never bought this)
Cocopeat (I never bought this)
or
A packaged accelerator (I never bought this)
Method:
Method:
Whether you're using a bin or a compost tumbler, the basic process remains the same. I started with a bin to get the hang of the process and now I've switched to a compost tumbler for ease of use.
1. If using a bin, drill holes on the sides and on the lid of the chosen bin. The holes are for air circulation. Holes can be drilled at the bottom too. Some water (which is also called compost tea) might get released during the composting process. Place a tray or a tub below the bin to collect this water.
I didn't have a drill machine, so I didn't drill any holes. I just used to poke the mix quite often to aerate it.
2. Put a couple of inches of soil in the bucket.
3. Cut greens in small pieces. This helps in faster decomposition. Remember, the smaller and softer the stuff, the faster it's going to decompose. Put greens in the bin.
4. Add double or triple the quantity of dried leaves which will act as browns. You can crush leaves lightly for a faster decomposition.
4. Add double or triple the quantity of dried leaves which will act as browns. You can crush leaves lightly for a faster decomposition.
5. Add accelerator. I generally use garden soil or ready compost or a bit of sour curd as an accelerator.
6. Mix with a shovel. Cover it with browns again.
7. Keep adding greens and browns to this mix everyday or every few days and keep turning. I add a bit of soil or leaves as the top layer every time I add greens to the bin. This deters flies.
8. When the bin gets full, let it rest. I poke the mix every few days for it to aerate. If you're using a tumbler, turn it every other day too. The compost will get ready in around 2 months, depending on a lot of factors, including weather.
9. While the first bin rests, start the same process in another bin. If you're using a double chambered compost tumbler, let the first chamber rest and start the process in another chamber.
Location of the bin:
Keep it on a flat surface and accessible, yet not too close to your house.
Place a tray or a tub below the container if you want to protect your flooring from compost tea spillage. Compost tea is the liquid that oozes out of the composting mix.
I leave my tumbler out in the sun and rain, with the flaps closed - of course! If the sun is too strong in your area, you can keep the tumbler in a slightly shaded spot.
What should the consistency of the mix be?
The consistency of the mix should be like a moist sponge. When you pick a handful of this mix and wring it, water shouldn't drip out of your hand. However, the mix should not be totally dry. It should be feel moist.
Too wet, and the compost will start smelling.
Too dry, and the compost will show a white fungal growth and won't decompose well.
Common Issues:
1. Smelly Compost - If you've added too little browns, it would start smelling bad. To rectify this, add at least double or triple the browns, get the moisture level right and aerate the compost well.
You can empty the contents of the bin in another bin or a tray and sun and aerate it for a while. Don't leave it out for too long as it would attract flies.
2. Wet Compost - Again, add more browns and aerate it well. The issue of smelly and wet compost go hand in hand. The compost starts smelling when it's wet and not well aerated.
3. Flies and Fruit Flies - Make sure that the compost is covered with browns or with soil. If there are fruit scraps like banana peels, pineapple skin, melon rinds, lemon peels etc. fruit flies get attracted to them. The easiest way is to bury these peels in the compost and cover them with soil. This helps prevents flies to get to their food source.
4. Maggots in the Compost - Add more browns and get the moisture level right.
5. Dry Compost - If the mix has gotten too dry, it won't decompose well. You can add some water to the mix.
6. Fungus in the Compost - You might see some white stuff in the decomposing mix. This is fungus, which is a decomposer. It's not harmful for your compost but a sign that your mix is decomposing, which it's supposed to be doing!
So basically, the answer to most composting issues would be:
Add More Browns!!
Add More Air!!
Keep it Moist!!
Cooking Time:
This depends on a lot of factors. I would say, don't worry too much about it. Fill it, shut it, forget it (errr...just keep aerating it though!).
Decomposition is a slow process. It takes time and even if you are at it diligently, expect just 2-3 rounds of totally finished compost in a year.
If the temperature is in the 70s (F) and you've cut the greens in small bits and have diligently balanced greens and browns, the compost can get there anywhere between 2-3 months.
You'll still find some stuff that hasn't been decomposed, like pistachio and peanut shells, mango and avocado pits, corn cobs etc. You can take this undecomposed stuff and add it to the next batch of compost.
You might be surprised to see that the final output has reduced to one-third of the original mass or even less. As organic stuff decomposes, it loses moisture and hence volume.
When the mix looks brown and smells like earth and when you're not able to identify if something was a former banana skin or an avocado peel, when you pick a lump and it crumbles well in your hand, voila! You've done it! Your compost is ready and it's time to celebrate!
Serve:
When the compost is done, serve with lots of love to your plants. Add a handful to top up your pots or add a layer to your beds. Your plants will express their gratitude by being healthier, greener and more productive:)